1899-1902.
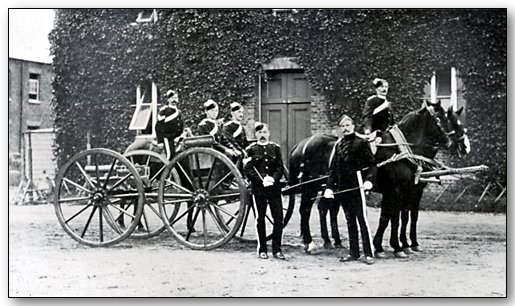 |
| Maxim Gun Detachment 13th Hussars, 1899 From: C. R. B. Barrett, History of the XIII Hussars, 1910 |
B-P served with the 13th Hussars in India, Afghanistan, South Africa and, on home service, in England. In 1912, he was appointed Colonel of the Regiment. Over the years, he would write about his experiences in several books and in hundreds of letters home, many illustrated with his sketches. The following is an excerpt from the Regimental History, C. R. B. Barrett, History of the XIII Hussars, 1911.
CHAPTER XXXVI.
South African War, 1899-1900.
Part One. To the Relief of Ladysmith.
IN this section of the history of the 13th Hussars no attempt will be made to deal with the causes which led to the South African War, neither is it any part of our duty to give a narrative of the events of this strenuous struggle as a whole. We shall confine ourselves entirely to the services of the regiment: as it is with the regiment, as a regiment, that these pages are concerned. For those who desire a history of the war there are already other books to which reference can be made. Space, too, has to be considered, and hence even a bare chronological list of the events must be omitted.
By such a list, starting from the Boer ultimatum and concluding with the acceptation of the British terms, no less than eight closely printed columns of Haydon’s Dictionary of Dates are filled, and to enlarge upon this mass of information, in even the most superficial manner, the writer estimates would make a volume in itself. The printed record of the services of the 13th Hussars during the war, compiled by Major J. H. Tremayne, 13th Hussars, is contained in an 8vo book of 202 pages, and this book is the authority upon which this account is entirely based. Major Tremayne’s account is apparently transcribed from the MS. Regimental Record.
To condense the information contained therein will be, however, by no means an easy task, the facts being so very many. In the last chapter the fact that the regiment left Aldershot for Liverpool and embarked there was mentioned. The details of the journey and voyage will now be given with greater elaboration.
On November 9, two and a half squadrons of the regiment left Aldershot for Liverpool in three trains, starting at 7.40 P.M.
After an all night journey Liverpool was reached, and the men embarked on the hired transport No. 61 S.S.. Templemore. Strength-22 officers, 1 warrant officer, 502 non-commissioned officers and men, 42 chargers and 400 troop horses. Officers-Colonel Blagrove, commanding; Majors W. C. Smithson and F. J. Murphy; Captains E. A. Wiggin, J. H. Tremayne (Adjutant), and A. H. M. Taylor; Lieutenants F. H. Wise, J. F. Church, A. Symons, E. W. Denny, H. J. J. Stern, F. G. Bayley, A. W. B. Spencer, J. T. Wigan, J. D. Lyons, and W. Pepys, and 2nd Lieutenant T. H. S. Marchant; Lieutenant and Quartermaster G. Rupert; Attached, Lieutenant R. N. Smyth, 21st Lancers, 2nd Lieutenant F. W. Jarvis, Loyal Sussex Hussars, Major F. J. Lambkin, R.A.M.C., and Veterinary-Major F. Smith, A.V.D.
The remainder of the regiment followed on November 10, and embarked at Liverpool on November 11th on the hired transport S.S.. Montfort.
Strength: 4 officers, 66 non-commissioned officers and men, 8 chargers and 52 troop horses.
Officers: Major M. A. Close; Captain L. S. Battye; 2nd Lieutenant E. F. Twist; Attached, Lieutenant E. R. Clutterbuck, 4th Hussars. The reserve squadron remained in Aldershot under the command of Captain A. H. R. Ogilvy, with whom were 2nd Lieutenant G. H. Hodgkinson and Lieutenant and Riding-master R. M’Walter. Strength of reserve squadron left at Aldershot, just under 400 noncommissioned officers and men.
The Templemore was not a particularly good ship for horses, but proved to be a good sea boat.
Leaving the Mersey, November 12, she arrived at Las Palmas November 17. Sailing the next day, Cape Town was reached about 2.30 P.M. on December 2.
The Templemore anchored close to the Columbia, with the 10th Hussars on board, who were just about to disembark. Between November 12th and November 24th there was a good deal of sickness among the horses, one or more dying daily, after which the health of the animals improved. On the voyage 1 charger and 21 troop horses were lost. On arrival at Cape Town the Templemore was ordered on to Durban, and sailing at 5 P.M. on December 2nd arrived at its destination on December 5. It turned out that after she had left Cape Town a belated order arrived for the 13th to disembark at that place. Attempts were made to intercept the vessel from East London, but failed.
At 3.30 P.M. December 5th the 13th disembarked at Durban, and on the following morning entrained for Mooi river, the first train starting at 7 A.M. The last train left Durban at 11.25 A.M., reaching Mooi river at 3 A.M. the next morning.
At that time it had only been possible to unload one train, and the whole of December 7th was occupied in getting the baggage, &:c., up to the camp, a distance of about one mile. Transport was very limited, but everything which he could do to assist the 13th was done by Major G. M. V. Hunt, Army Service Corps, and formerly an officer in the regiment. It should be mentioned that 2nd Lieutenant Marchant had been left at Pietermaritzburg to collect the transport.
On December 7th Major C. Williams, who had been sent to Spain in July by the War Office to buy mules, rejoined the regiment.
Three days later the 13th marched to Willow Grange, a distance of 12 miles, where 2nd Lieutenant Marchant rejoined with the transport.
The regiment marched on the morrow to Estwart, a distance of about 7 miles, where on the 12th it joined Lord Dundonald’s brigade.
The brigade consisted of the Royal Dragoons, 13th Hussars, Thorneycroft’s Mounted Infantry, and Bethune’s Mounted Infantry, with a composite regiment made up of the Natal Carabiniers, the Mounted Infantry Company of the King’s Royal Rifles, the Imperial Light Horse, and the Natal Police.
The irregular corps had no signallers, and the 13th were ordered to find them.
It was with great difficulty that orders for these men to rejoin the regiment many months after were carried into effect.
At 4 A.M., December 14, the regiment marched to Chieveley. Meanwhile the Montfort, having on board, besides Major Close and the detachment of the 13th, half the 61st Battery Royal Field Artillery and 100 Sappers, had passed the Templemore almost at starting, and sailed for Queenstown, where she embarked the 79th Battery Royal Field Artillery. From Queenstown she made her way to Gibraltar, arriving there November 19, and there embarking the 6th Fortress
Company Royal Engineers. Proceeding on her voyage, the Montfort coaled at Las Palmas, and reached Cape Town on December 5. Thence she was sent to East London, where the artillery disembarked.
Next day the Montfort sailed for Durban, where she arrived on the 13th. The detachment of the regiment at once disembarked and joined the 13th Hussars at Chieveley on the evening of the next day. On the voyage 11 horses died, though the ship was comfortable, and the accommodation for the horses was good. There were 300 horses on board, yet there was no veterinary officer.
On the same day the South African Light Horse, commanded by Major the Hon. J. Byng, 10th Hussars, joined the brigade. That night, about 8.30, tents were struck, and the brigade bivouacked for the night.
On December 15th there was a remarkable eclipse of the moon.
At 4 A.M. Dundonald’s brigade, with the 7th Battery Royal Field Artillery, moved out of camp and moved off to operate against the left flank of the enemy. The 13th was halted on the high ground facing Hlangwani, while Thorneycroft’s Mounted Infantry and the South African Light Horse with the Composite Regiment went on dismounted to attack the hill. The force that could be employed at this point was insufficient,they lost heavily, and had to retire. The squadron under Major Williams was sent to help in the retirement. Lieutenant Bayley, who had been sent on with the signallers with the battery, was under heavy fire, and Private Humphrey was wounded. Another signaller, Private Wright, who was attached to the South African Light Horse, was also wounded in the attack on Hlangwani. On the left, things were going worse, and it was clear that the brigade would not reach the Tugela river that night. At 3 P.M. the order to retire was given, Major Smithson’s squadron being sent to escort the naval guns out of action. One gun was found deserted by the native drivers, and the oxen had scattered. However, some other drivers were found, the oxen collected, and the gun safely withdrawn. During the retirement news came that Colonel Long’s guns had had to be left on the field, and when the regiment arrived near Chieveley station they were ordered to go out and cover these guns, as an attempt to bring them in after dark would be made. But this order was almost immediately cancelled, and about 5 P.M. the 13th reached its camp. During the day Lieut.-Colonel Blagrove’s horse was hit. The weather was extremely hot, there was hardly a breath of wind, and the horses had been without water since the evening before. The regimental stretcher-bearers did most excellent work during the day, one of them, Private Levey, being deserving of particular commendation. The names of the others were: Gallagher, Thompson, Twyman, Carstairs, Ellis, Meadon, and Smallwood. A regimental order 16/12/99 was issued on the subject by Major Lambkin, senior medical officer of the cavalry brigade. Had it not been for the devotion of these eight men, a number of wounded belonging to the other mounted corps engaged would have had to lie on the field wounded and unattended to for many hours.
On the following day there was an armistice till midnight. By an accident, despite the strenuous efforts of Lieutenant Pepys and several men, Private Billington lost his life this day. While watering his horse he got into a deep hole and was drowned. His body was recovered December 21. At midnight, December 16, the Royals and the 2nd Infantry Brigade marched back to Frere.
At 3 A.M., December 17, the regiment moved out, and was occupied the whole day in watching the front, during which time the camp was moved back nearer to Chieveley station. Two horses belonging to C Squadron were hit, and there was a good deal of suffering owing to the heat and to the want of water for the horses.
The next two days were quiet, but on December 20th a detached post under Lieutenant Denny was surprised on Hussar Hill. Private Smith and Private Ross were killed.
Outpost duty, clearing farms, cattle guards, and water picquets, &c., occupied the regiment from December 21 to January 4.
One, it is to be hoped very unusual, duty was put upon a party of the 13th on December 23, by whose orders the writer knows not. On that day 2 officers and 20 men of B Squadron were turned out, and for what purpose? To be cinematographed! That their disgust was great is not to be wondered at.
From the Field Force Orders, 1/1/1900.
The following message has been received from Sir A. Bigge, Osborne, by
the General Officer Commanding-in-Chief:
Please communicate following from Queen to all troops in S. Africa, including Ladysmith, Kimberley, and if possible Mafeking.
Wish you all a bright and happy new year. God bless you all!
V. R. I.
On January 5th A and C Squadrons, and all the irregular cavalry, reconnoitred towards Hlangwani. The British guns fired several times at the hills, and the force returned to camp at 4 P.M.
Next day, as the Ladysmith guns could be heard from 2 A.M., during the afternoon the whole division turned out, and with the object of bringing the Boers back from Ladysmith made a demonstration against the enemy’s position at Colenso.
The Boers were seen descending from the hills and going into their trenches. The British artillery opened, but their fire was not returned. About 7 P.M. the force again reached camp.
January 8. News came of the determined attack by the enemy on Caesar’s Camp and Waggon Hill, which was repulsed by Sir George White, but in the camp itself, the 7th, 8th, and 9th were quiet.
There was now a prospect of moving camp, and not before it was advisable, as many men were beginning to go sick, and most of the officers to feel unwell. Besides, too, a move forward meant an attempt to relieve Ladysmith.
But the regiment was not to remain entire as previously. A Squadron, divisional cavalry, was posted to General Clery’s division, B Squadron, divisional cavalry, to General Sir C. Warren’s division, while C Squadron and headquarters were corps troops.
On January 10th Lieut.-Colonel Blagrove took over command of the troops at Frere, and Major Close assumed command of the regiment.
A Squadron marched at 6 A.M. and bivouacked near Pretorius Farm, and were lucky to get their baggage.
The previous night had been very wet, the transport could not get along, and to make matters worse both Clery’s and Warren’s transport had to use the same road except for the last few miles. Both these divisions were moving towards Springfield.
C Squadron, less Lieutenant Denny and his troop, who were escorting Sir R. Buller’s baggage, marched at 8 A.M. Just before reaching camp there were two very bad drifts to be crossed. A party of H.M.S. Terrible under Lieutenant Ogilvy, R.N., that had already crossed, most kindly gave the men of the squadron tea and something to eat. Lieutenant Jarvis was acting as transport officer, and by great exertions managed to get the squadron baggage into camp by 11 P.M. The baggage of many units of the force was not so ably handled, and did not get over the first drift that night.
B Squadron had found the night outposts on the 9th, and did not march until 9 A.M. They reached the bivouac at Pretorius Farm about 10 P.M., and far ahead of their baggage.
On January 11, C Squadron and headquarters marched to Springfield Bridge, thence to Springfield Camp, and arrived on the 13th at Spearman’s Camp. B Squadron marched to Springfield Camp and there remained till January 10, being employed mainly in escorting waggons.
Squadron did not move from Pretorius Farm till January 14, when they marched to Spearman’s Camp. On the 16th the two divisions marched by night and bivouacked above Trichaard’s Drift, leaving their baggage at Spearman’s Farm Camp. On January 12, while yet at Pretorius Farm, the A Squadron had exchanged shots with the enemy during a reconnaissance towards Chieveley, but no casualties occurred.
On January 17, the Royal Engineers pontooned the river, and about 2.45 P.M. the mounted troops began to cross the drift. This drift ran slantways up streamthe river was much swollen, the current swift, and the bottom rocky. It was a nasty place to cross. Two men, Privates Prince and Guiler, were swept down stream. The first named was saved by Lieutenant Wise, who swam out to his assistance. Private Guiler unhappily was drowned, though a good swimmer, as his equipment hampered his movements. Despite the gallant efforts of Trooper David Selanders of the Natal Carabiniers, and of Captain Tremayne, 13th Hussars, to save the poor fellow, he was swept away. Captain Tremayne would also have lost his life had not Trooper Selanders saved him. The latter received the silver medal of the Royal Humane Society, while the bronze medal was awarded to Lieutenant Wise and Captain Tremayne.
That night C Squadron and headquarters bivouacked near Venter’s Spruit. A Squadron crossed next morning and joined C Squadron and headquarters. B Squadron crossed by the pontoon bridge and remained with the 5th Division.
Lord Dundonald’s brigade was now thus composed : 2 squadrons Royal Dragoons, 2 squadrons 13th Hussars, S.A.L.H., T.M.I., B.M.I., Natal Carabiniers, 1 Co. K.R.R., Mounted Infantry, 1 Co. L.L.T.
The brigade marched forward nearly to Acton Holmes, and it looked as if they would soon come in contact with the Boer right. Expectations were raised that the movement would assist in obtaining the longed-for relief of Ladysmith. But by the 10th the brigade was back again near Venter’s Spruit.
The A and C Squadrons, while supporting the S.A.L.H. under Child’s Hill, had been exposed to shell-fire, but without sustaining loss. The regimental signallers came in for commendation, Corporal Smith and Private Servey being commended by Lord Dundonald for good and gallant work. Seven bullets pierced Private Servey’s flag both men fully deserved the mention in despatches which came later.
On the morning of January 19th Lieutenant Symons, while out on reconnaissance duty with his troop (B Squadron) towards the Boer position, obtained useful information for which he was commended by General Sir Charles Warren.
That same day B Squadron formed an escort to guns on a hill about one and a half mile north-east of the drift. About 2 P.M. the squadron came under a heavy fire from the Boers on a kopje distant about 800 yards. Lieutenant Smythe’s troop was obliged to retire. Corporal Coghlan and Private Findlay were both severely wounded. An infantry reinforcement arrived, and at 5.30 the squadron retired to the bivouac.
January 21. C and A Squadrons returned to the bivouac on Venter’s Spruit and formed outposts, &c., on the left flank. The duties of B Squadron with the 5th Division had principally been cattle guards one of their horses was hit on this day.
Lieutenant Spencer, who was ill, was sent to hospital, being subsequently invalided home. He rejoined the regiment at Newcastle, Natal, October 3, 1900. While the 13th was thus remaining at Venter’s Spruit very severe fighting had been going on around and the casualties had been heavy. The regiment longed for more active employment. News was vague and usually contradictory.
On January 24th it was announced that the British had occupied Spion Kop, and hopes of fighting were raised in the regiment. From Venter’s Spruit the troops on Spion Kop were visible, and the rain of shells that was being poured on them throughout the day was painfully apparent, though the effect was unknown. Next morning came the news that the hill had been evacuated during the night, and the intelligence caused depression even among the most sanguine.
At 6 P.M. on the 26th, C Squadron moved off to retire and crossed the pontoon bridge in a downpour of heavy cold rain. On the south side they halted till about 3.30 A.M., when they moved off to the old ground above Trichaard’s Drift, which they had left on the 16th. A Squadron was ordered to act as rearguard for the whole force, but who gave the order is not clear. It was hardly the work for a squadron of cavalry, as the night was both very dark and very wet, and the whole country much intersected by barbed-wire fences. General Hildyard remarked what a difficult and nasty task the squadron had to perform.
On January 27th A Squadron crossed the Tugela river about 6 A.M. and joined the C Squadron above Trichaard’s Drift, being, of course, the last troops to pass over the river. Both squadrons then returned to Spearman’s Camp.
Possibly supposing the retirement to be the prelude to a night attack, the Boers opened a very heavy fire all along their position. B Squadron turned out about 5 P.M., and placing single men at intervals of 100 yards all along the line of retirement thus marked out the route. It was a dreary and uncomfortable night’s work. About 4 A.M. they crossed the river and bivouacked about one and a half mile beyond it. Later in the day B Squadron marched to Springfield Camp, but did not get their baggage till January 28.
One of the men of the 13th (Private Judge) was taken prisoner on the 25th, after having received a severe wound. He had been attached to General Clery’s Staff and lost his way. He was found in Pretoria when the British entered that place. Invalided home, he was later discharged as medically unfit from the effects of his wounds.
January 29. Major Murphy went to hospital. He was subsequently invalided home and did not rejoin the regiment in South Africa.
Next day the brigade turned out at 10 A.M. and reconnoitred towards Hunger’s Poort. The force returned about 6 P.M. Meanwhile B Squadron, with the exception of Lieutenant Smyth’s troop, which remained with Sir Charles Warren, marched in and joined the regiment. The strength of the 13th in camp was now 23 officers, 1 warrant officer, 440 non-commissioned officers and men, and 385 horses,the total strength being 1 warrant officer, 562 non-commissioned officers and men, and 475 horses.
At Spearman’s Camp the regiment remained until February 5. Meanwhile on February 1, Captain Taylor and Lieutenant Bayley joined the Staff of Colonel Burn-Murdoch as Staff Officer for brigade duties and Signalling Officer respectively. Both these officers remained on Colonel Burn-Murdoch’s Staff till the end of the war. Lieutenant-Colonel Blagrove, who had been commanding the troops at Frere since January 10, rejoined the regiment on February 2. The 13th, with the Royal Dragoons and the 14th Hussars, were now formed into a brigade under Colonel Burn-Murdoch.
About 6.30 A.M. on February 5, the brigade marched down the hill under Brackfontein, following the infantry and followed by the baggage. Heavy fighting in plenty was expected before the cavalry could get a chance, but then the hope was that when the artillery and infantry had done their work the brigade would push on and Ladysmith would be relieved.
All that day the brigade was dismounted and stationary under Swartzkop, whence a grand view of the feint on the left which opened the battle of Vaalkrantz could be obtained.
Five batteries of artillery were pushed to the front and served their guns nobly under a heavy shell-fire, retiring with the precision of a review day when the object had been obtained. The infantry then advanced across the river, and at nightfall matters looked as if progress had been made. Dawn broke next morning with a haze, but this cleared off, and about 5.30 A. M. the enemy’s big gun from Dornkloof sent a shell unpleasantly near the bivouac. The horses were led away, and were followed by two or three more shells which fell pretty close. At last one burst right in the middle of A Squadron, but neither a man nor a horse was injured. This big gun was most troublesome, and was never knocked out, though it was reported that one of our shells exploded a magazine near it.
That day the brigade did nothing, neither did any intelligence come as to how matters were going. In the evening they went into bivouac farther back towards Potgeiter’s Drift.
On the morrow the brigade moved still farther back, and put the lines down. That evening about 6.15 P.M. an order came to saddle up at once and proceed to Spearman’s Camp. There the brigade arrived at 9 P.M.there was no need to inquirethe third attempt to relieve Ladysmith had failed.
At Spearman’s Camp the difficulties in the management of the transport were very great. The road down to the plain was very steep, and the road beneath the hill very narrow. Blocks were frequent, and great credit is due to Lieutenant Jarvis (13th Hussars), who managed the brigade transport. It was a good performance to get the waggons up, and this officer never failed. From Colonel Burn-Murdoch, Lieutenant Jarvis received particular commendation for the manner in which his duties at this time were performed.
On February 10, the tents were struck at 9 A.M., the waggons packed and all sent off to Springfield. The A and C Squadrons formed an outpost line to cover the baggage with B Squadron in reserve. The brigade left Spearman’s Camp at 6.30 P.M., arriving at the camp above Springfield Bridge about 10 P.M. to find the tents pitched and a welcome meal prepared. The brigade now formed part of a detached force under Colonel Burn-Murdoch. This consisted of the Royal Dragoons, the 13th and the 14th Hussars, 2 naval guns, the York and Lancaster Regiment, and the I.L.I.
Occupied in patrolling and outpost duties mainly, the 13th remained at Springfield until February 21.
Between February 10th and February 21st the following events are to be noted. A squadron of the Royals on outpost duty was surprised, an officer and five men being wounded, while an officer and seven men were captured. C Squadron, the inlying picket, turned out and were out all day. The Boers on Dornkloof, six and a half miles away, put three shells from the big gun quite close to them.
Reports were current on the 14th and 16th that the enemy was quite close and in strength, but no Boers were seen. On February 11th news came of the relief of Kimberley by General French. Two days later the welcome gift of a large box of chocolate from Mrs Wise (the wife of Lieutenant Wise) arrived, and was much enjoyed by all.
The brigade moved on February 21st from Springfield to Chieveley, and next day bivouacked under Hlangwani.
On February 23rd the brigade crossed the Tugela again by the pontoon bridge, being shelled throughout the day from Pieter’s. That night they bivouacked under Fort Wylie, "a dirty place, after three months’ occupation by Boers." A large quantity of the enemy’s ammunition had been left behind here. It was of every description, soft-nosed and hollow-nosed included.
February 24. About 2 P.M. B Squadron, still without Lieutenant Smyth’s troop, went out to escort the Royal Horse Artillery, and remained with them on and near Monte Cristo until February 28, when they rejoined. The brigade recrossed the Tugela about P.M. by the drift near the bridge, and went into bivouac south of Colenso.
Next morning the brigade moved to the hill north-west of Hussar Hill, and C Squadron went on to Weenan, but all were ordered back to Colenso on the 26th. As soon as the lines were down, an order arrived to saddle up, and back the brigade had to march to Chieveley in a drenching rain. Late that night C Squadron rejoined from Weenan, leaving Lieutenant Wise and 21 men there.
Next morning the brigade left Chieveley and marched again to Hlangwani, where they had a good view of the taking of Pieter’s Hill. The cheering news of the capture of Cronje and his army was received the same day.
On February 28th the regiment crossed the river for the fifth and last time. The mounted troops were pushed on about 4 P.M. A Squadron, supported by C Squadron, made a demonstration against Umbulwana. They came under shell and pom-pom fire but suffered no casualties.
The effect of this demonstration was to permit Lord Dundonald with a small party of irregular cavalry to work round and get into Ladysmith without opposition. In the Boer position at Pieter’s Hill
a quantity of bread was found, and after the " hard tack " of the last few months the supply was most welcome, having all the sweets of novelty. B Squadron now rejoined the regiment.
On March 1st the brigade reconnoitred towards Ladysmith. Shortly after starting the force met The Times correspondent, who had been shut up in Ladysmith. He brought the news that the Boers had evacuated all their positions. Hope of being permitted to push on and chastise the retreating foe was now high, and the brigade proceeded as far as the foot of Umbulwana. Here some Kaffirs stated that the Boer waggons, and even their guns, were hopelessly stuck on the road some seven or eight miles ahead. It was a great chance, but a peremptory verbal message reached Lieut.-Colonel Blagrove, followed almost immediately by a written one, to the effect that he was not to go on. Consequently the brigade filed along the road round Umbulwana, a road strewn with things such as white satin shoes and other articles of feminine or non-masculine attire, dropped by the enemy in their flight. Presently the head of the column came within sight of its goalLadysmith, upon which it was turned about and returned to Nelthorp.
Major Williams and the A Squadron on the left, however, got into Ladysmith without opposition, as the Boers had left their laagers in much haste. Major Williams was asked by Sir George White to take his squadron on in support of his troops till the rest of the cavalry came up. He went out to support General Knox, but a message from Sir R. Buller recalled him, and he returned to Nelthorpe in the evening.
The orders given to the cavalry during the Pieter’s Hill operations were most indefinite, the men being moved about continually in what appeared to be an aimless manner.
The historic telegram sent by Her Majesty Queen Victoria to Sir Redvers Buller on receipt of the news of the relief of Ladysmith, and the Special Army Order issued by Sir Redvers Buller to the "Soldiers of Natal" on March 3rd, are both too well known to need quotation here.
[From: H. W. Wilson, With the Flag to Pretoria, 1902:
A special Army Order issued by General Buller stated in no exaggerated terms the greatness of the work that had been accomplished and of the difficulties that had been overcome.
"The relieving force had to make its way through unknown country. across unfordable rivers, and over almost inaccessible heights in the face of a fully-prepared well-armed, tenacious enemy. By the exhibition of the truest courage which burns steadily besides flashing brilliantly, it accomplished its object. The general commanding congratulates both forces on their martial qualities, and them for their determined efforts. He desires to offer his sincere sympathy to the relatives and friends of the good soldiers and gallant comrades who have fallen in the fight."]
 |
"The 13th in the
South African War." From: C. R. B. Barrett, History of the XIII Hussars, 1910. Chapter XXXVI: The South African War, 1899-1900. Part Two: "To December 1900." |
|
 |
"The 13th in the
South African War." From: C. R. B. Barrett, History of the XIII Hussars, 1910. Map of Area of Operations, 13th Hussars. |
|
 |
"The 13th at Waterloo" recounts the actions of the 13th Light Dragoons during the Waterloo Campaign of 1815. From the Regimental History, C. R. B. Barrett, History of the XIII Hussars, 1911. | |
 |
"The 13th at Balaclava." The 13th Light Dragoons in the Charge of the Light Brigade before the Russian guns at the Battle of Balaclava during the Crimean War. From the Regimental History, C. R. B. Barrett, History of the XIII Hussars, 1911. | |
 |
The 13th Hussars in India & Afghanistan, 1874-1884. From the Regimental History, C. R. B. Barrett, History of the XIII Hussars, 1911. | |
|
|
"H.M. 13th Light Dragoons." The Regiment served in India from 1819-1840. During that time, as the 13th Light Dragoons, the regiment took part in the suppression of the mutiny at Bangalore and in actions at Kurnool and Zorapoor. Excerpts from the Regimental History, C. R. B. Barrett, History of the XIII Hussars, are featured in the Family History in India website, which is designed to help people research their European and Anglo-Indian family history in colonial India. | |
|
|
In 1876, Baden-Powell was posted to his first regiment, The 13th Hussars, a cavalry regiment with a long tradition. They were perhaps best known for their part in the Charge of the Light Brigade before the guns at Balaclava in the Crimean War. The regiment continues today as part of The Light Dragoons, an armored regiment of the British Army that saw service in Desert Storm. | |
|
|
It was at the Siege and Defense of Mafeking during the South African (Anglo-Boer) War that Baden-Powell made his name and first gained public recognition. 1999-1902 marks the Centennial of the War. Developed as part of that observance, Perspectives on the South African War provides a collection of links to original and contemporary sources on the South African War. | |
|
|
Robert Baden-Powell, Founder of the World Scout Movement, Chief Scout of the World. A Home Page for the Founder. Links Relating to Baden-Powell on the Pine Tree Web and elsewhere. | |
 |
Return to the Pine Tree Web Home Page |
Your feedback, comments and suggestions are appreciated.
Please write to: Lewis P. Orans

Copyright ©
Lewis P. Orans, 2002
Last Modified: 9:51 PM on July 31, 2002
|
|